Guitar Frets: What Are They And Why Are They Important?


This article teaches what guitar frets are, their purpose, and how many frets there are on an acoustic and electric guitars.
Frets are important components of guitar playing. Without frets, finding notes and chords becomes guesswork. Guitars with fewer frets can sound smooth and mellow, while a guitar with more frets may have a brighter sound.
However, when strings start to buzz, it may mean that your frets need work. So how do you clean and level frets on your guitar to get the best sound?
Read on and find out everything you need to know about guitar frets.
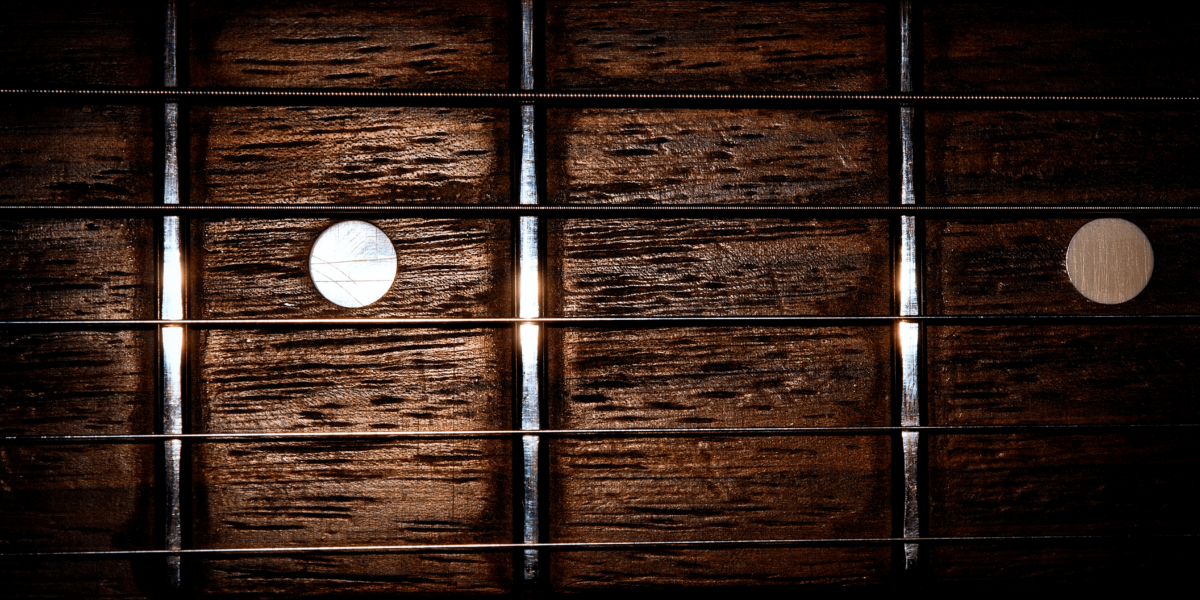
What are guitar frets?
Guitar frets are strips of material spaced at specific intervals on the fretboard. Most often, the fret material is a nickel alloy. Other materials such as bone, wood, ivory, and stone don’t bend easily and are difficult to fit into a fretboard.
Strings can easily bend over the domed top surface of the fret. At the bottom of the fret is a shaft that fits into the guitar neck. Some frets are glued into the fretboard, while others are set firmly into the wood.
What is the purpose of guitar frets?
Frets divide the guitar into sections based on the Western music scale. They give the musician a guide making it easy to find standard notes. Each fret creates a point of tension for the guitar sound. If a guitar has no frets, the string vibrates from the guitar bridge.
The number of guitar frets.
Most guitars have between 19 and 24 frets. The number of frets can vary based on the type of guitar and the genre of music you play. Acoustic guitars usually max out at around 20 frets, while electric guitars have at least 21 frets.
How many frets are on an acoustic guitar?
Acoustic guitars can have 18 to 20 frets. However, the upper frets on an acoustic guitar are more for aesthetics than for use. The high frets on an acoustic guitar are hard to reach. Many guitarists don’t use the upper frets at all and stick to the 12 to 15 frets that are easily accessible.
How many frets are on an electric guitar?
Electric guitars usually have at least 21 frets up to 24 frets. When a guitar has fewer frets, the tone of the guitar has a warm, mellow tone. Many jazz players prefer a guitar with fewer frets because of its smooth, jazzy sound.
However, a guitar with 24 frets gives you four full octaves and can be easier to play. If you enjoy playing songs in the metal genre, you may need 24 frets for some songs.
What is fret leveling, and how do you level guitar frets?
When you play the guitar regularly, the strings can wear down or scratch the frets erasing the fret crown. A flat fret can be uncomfortable to play and may cause your guitar strings to buzz. The strings need to be able to contact the tip of the crown to give a clear sound. Leveling the frets puts them back at a standard height. So how does it work?
Step 1: Check your fret level with a fret rocker
Leveling, crowning, and polishing frets is a time-intensive process that can take up to five hours. So, before you start, make sure that fret leveling is necessary. Use a fret rocker to check your frets. The fret rocker has three sides, so you can measure the frets closer together and farther apart. Straddle three frets and see if the tool is stable. If it rocks, this means that the frets are unlevel.
Step 2: Remove the strings and guitar neck from the body
To repair uneven frets, remove the guitar strings and neck. Bolt-on necks are the easiest to remove. Simply remove the bolts with a screwdriver. Once you separate the guitar neck from the body, you are ready to go to work.
Step 3: Mark each fret with a permanent marker
Use a permanent maker to mark the top of each fret. This trick helps you know if all the frets are level or not. Once all the marks disappear, it is time to stop sanding.
Step 4: Protect the fretboard with masking tape
The wooden fretboard shouldn’t come in contact with the sandpaper. However, for extra protection, you can protect the fretboard with masking tape.
Step 5: Sand the frets
A leveling beam is a straight block of wood covered in sandpaper. You can make one or buy your own. If the beam is large enough, you can lay the neck face down on the board and rub it back and forth using even pressure. Once all the marks from the permanent marker are gone, you know it is time to stop sanding.
Step 6: Recrown the frets
The frets are now level. However, your job is not over yet. You need to recrown each fret individually using a triangle file. This process can be painstaking and time-consuming. You may need the help of a luthier to finish the job correctly. With the crowns in place, you should have a comfortable guitar with a great sound.
How to clean and polish guitar frets.

After you level your frets, you want to finish the job by cleaning and polishing your frets. Over time your guitar frets can become dirty and dull from the moisture in the air, sweat, or the oil from your fingertips. You may notice a difference in how it feels to play the guitar and its sound. Time to clean your frets. But how?
Here are some steps to clean and polish your guitar frets:
Step 1: Take the strings off your guitar
To clean and polish your frets without making a mess, you need to remove the strings from the guitar. This gives you access to dirty frets and makes your job easier in the long run.
Step 2: Protect the fretboard by using a fret guard
You don’t want to get the polish on your fretboard when you polish the frets. Protect the wooden fretboard by using a fret guard. The guard has a slot that fits over the fret and lays flush against the fretboard. For the upper frets, you may need to cover the wood with masking tape since the fret guard may be too big to be useful.
Step 3: Rub a polishing compound over the fret
Place a dot of polishing compound (such as Frine) on a microfiber cloth. Then, rub the polish firmly over the fret. You want to cover both the top and sides. Continue to clean until the fret looks clean and shiny. Polishing shouldn’t take more than a few seconds per fret.
Step 4: Use a cotton cloth to remove excess polish
After you apply polish to the fret and cover the top and sides, remove the excess polish. Use a cotton cloth and follow the same back-and-forth strokes you used to apply the polish. Also, if you notice polish on the wooden fretboard, wipe it off immediately.
Step 5. Restring your guitar
After you finish polishing all your frets, it’s time to restring your guitar. Now is a great time to add new strings to your guitar.
With a level, clean frets, and a new set of strings, it’s time to enjoy playing your guitar.
Learning is easy with guitar frets (and guitar apps).
Frets make playing the guitar easier. When your frets are clean and level, playing the guitar is more comfortable for your fingers and has the best sound. Frets can help you find the right notes—the right learning tools can make it easier to pick up skills on the guitar.
You can try the Simply Guitar app if you want to play the guitar but don’t know where to start. This app is a no-stress way to learn the basics of guitar playing and can start you off on your musical journey.
FAQs.