Keyboard Lessons for Beginners

If you’re new to the keyboard and want to learn how to play, these keyboard lessons for beginners set you out on the right foot.
You don’t always need face-to-face lessons to learn a new skill. If learning to play the keyboard is on your bucket list, this article will be a dynamic way to start. These keyboard lessons for beginners include critical first steps and tips like practice habits, hand placement, and connecting notes to the keys. Let’s help you lay a good foundation for your keyboard journey.
Understanding the positions of keys.
Each note on a keyboard has a name–a letter between A and G–that you need to know by heart. Music sheets or charts tell you which notes to play using symbols and letters.
A keyboard’s layout consists of a few sets of octaves. An octave constitutes seven white and five black keys:
- White keys are whole notes.
- Black keys are semitones higher or lower than the white ones they’re next to.
There are two groups of black keys in an octave, one with two black keys and the other with three. These are flats and sharps, and we use ‘♭’ and ‘#’ respectively to refer to them in music notation.
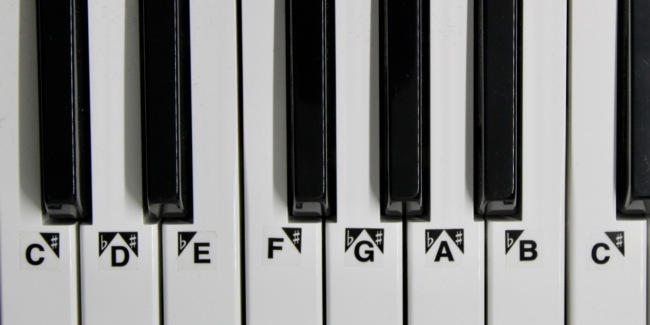
There is a letter for each whole note in that set. Sheet music and chord charts tell you which of those notes to play. The faster you learn the name of each key, the quicker you can start reading music on a page.
An effective way to start is by labeling each key. Here’s how you figure out each one’s letter:
- Look for a grouping of two black keys anywhere on the keyboard
- Find the white key to the left of these black keys
- Label this key C
- The first four keys to its right are D, E, F, and G
- The next two are A and B
- Then you start from C again
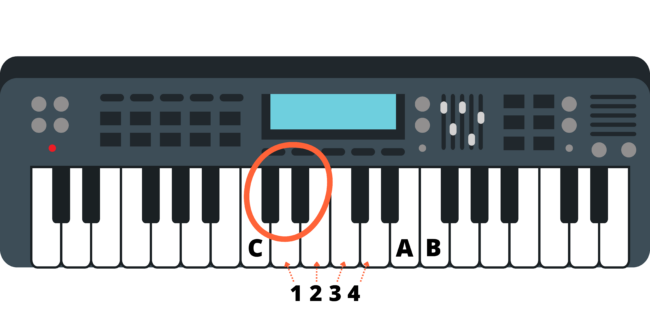
So, you can quickly identify any C note by simply looking for a group of two black keys and playing the white key to the left.
The notes to your right get higher in pitch, while you’ll find the pitch gets lower to your left. After labeling all the notes, you’ll see a C more or less in the center of the piano. This is middle C.
Learning chords.
Playing music also requires an understanding of scales and chords.
Scales are sequences of notes that explore the tonality of a key. Each note is either a whole or a half step up from the previous one. You’ll find major scales most commonly in music. They are as follows:
- A major: A, B, C#, D, E, F#, G#, A
- B major: B, C#, D#, E, F#, G#, A#, B
- C major: C, D, E, F, G, A, B, C
- D major: D, E, F#, G, A, B, C#, D
- E major: E, F#, G#, A, B, C#, D#, E
- F major: F, G, A, Bb, C, D, E, F
- G major: G, A, B, C, D, E, F#, G
You play a chord when you push down two or more notes simultaneously. In most cases, a chord consists of three notes–a triad. The three notes in a chord are the:
- Root note–the first note in the scale, giving the chord its name
- Third note–the third note in the scale (for major chords)
- Fifth note–the fifth note of the scale
There are different types of chords, with rules that stipulate how one should create the chords in that set. Common types include the major chords and the minor chords. The latter is simply changing the third of the chord by one half-step or a semitone.
Based on these rules, here’s a summary of major and minor chords you’ll use most often.

A chord sheet tells you which chords to play, or you can see a visual representation of what to play when playing from a musical staff on sheet music. Often, you’ll play a chord with your left hand while playing a melody with your right.
Practicing hand and finger position on a keyboard.
Knowing how to place your hands over the keys is as important as understanding music theory. When correct placement becomes a habit, you advance quicker in learning to play the keyboard.
For one thing, your hands are in the right position to reach notes far from each other. Also, many sheet music and chord sheets include guidelines about which fingers to use, so you need to understand what they refer to.
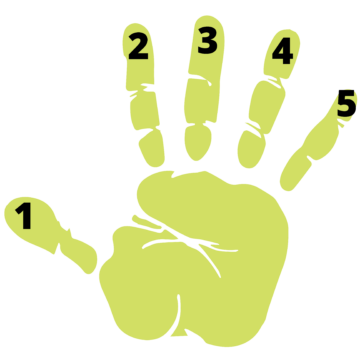
First, place your hands palms-down in front of you. Starting at your thumbs and moving outward, number each finger from one to five. Now you know which fingers a keyboard exercise or sheet music refers to.
Part of keyboard exercises is to help you become comfortable pushing down the keys. Here are a few exercises.
Exercise 1
With your hands on the piano, put your right thumb on middle C and label it number one. Now play C, D with finger two, E with finger three, and continue up to five. Vocalize which note you’re playing each time you press down to start memorizing their names.
Now play the sequence backward until you reach middle C again. Do the same with your left hand, playing downwards towards the lower tones and back to middle C.
You can continue practicing by moving your right hand one key to the right, so your thumb rests on D. Using the list of scales above, play the first five notes in that sequence. You’re playing a part of a scale!
Now do the same with each note in the octave.
Do the same with the left hand; as you feel more comfortable, you can do the exercise at a higher tempo. But don’t rush too much–you need to ensure proper form at all times:
- Curve your fingers
- Relax your wrist
- Line up your pinkies with wrists and elbows
- Relax your shoulders
Exercise 2
Practicing scales is also essential as part of piano lessons for beginners. Once again, play the entire sequence using the list of scales above.
For the C major scale, from C to C, use the following fingers, with the thumb going underneath the other fingers to play the fourth note in the sequence:
1 – 2 – 3 – 1 – 2 – 3 – 4 – 5
Do this going forwards and backward on both hands. This is how you improve speed, get to know your scales, and improve the independence of your two hands.
Practice coordination between your left and right hand.
Part of becoming a great keyboard player is having your left and right hand do entirely different actions. They need to function independently of each other.
Start practicing this by playing your C major scale using both hands, but in opposite directions. Your right hand moves up the keys, and your left hand goes down before returning to middle C.

After you feel comfortable doing this, play the scale with both hands moving in the same direction:
- Your right thumb starts on middle C, while your left pinky starts on an octave lower
- The right hand plays the scale as usual
- The finger sequence for your left hand will be 5 – 4 – 3 – 2 – 1 – 3 – 2 – 1, ending with the left thumb on middle C
- Then, do everything in reverse
For more exercises, you can use our article on the Best Piano Books for Beginners to find some excellent keyboard piano lessons for beginners to practice both hands.
A keyboard is a versatile instrument, and if you’re not sure yet which one to buy, our article on the Best Keyboard Piano for Beginners will be a great help. We cover more keyboard basics for beginners and review a few keyboard models.
Do you have any other questions to get your keyboard career started? Please leave a comment!


